Posted on

What is TTaskDialog? Made Surprisingly Easy!

What is TTaskDialog?

What is TTaskDialog? The TTaskDialog is another dialog that is present within Lazarus and Delphi. In older articles i discussed every single dialog box that was present in Lazarus. However, i left this one out mainly cause this was the most tricky dialog to use among them all. As for why it is tricky, that’s because you need to write code for it to actually work and show itself.

Where we left off before

In Older Posts i discussed all other dialog components of Lazarus. In this article we end that dialog series. And what better than to end it with a cool finale! The TTaskDialog or simply Task Dialog. Is the first dialog we will be writing code for and actually understanding. Ready yourself, and grab a water bottle while you are at it. Keep hydrated whenever coding!

How This Is Gonna Work

The Task Dialog unlike it’s other family members. Does not show up when run as code or double clicked on. It relies on other components to activate itself. And it relies on you to write the code to tell it how to look like. So to make things simple and easy, here is a list of stuff we are gonna do. Details will be given further below as examples!

1 – We use a button, and code it so that when we click it the Task Dialog activates.

2 – We Use the object inspector, to tell how the task dialog is supposed to look like.

3 – We Run the code and watch as the unseen becomes visible! Power of code!

Let’s begin!

What is TTaskDialog? Time For Making One!

Step 1 – Create A New Program:

An important note, i used the Program application type for all the articles related to dialogs. For the sake of those who are new to this article, Here is how we create the program needed for us to code.

Click New In The Top Right Of The Lazarus IDE

What is TTaskDialog?

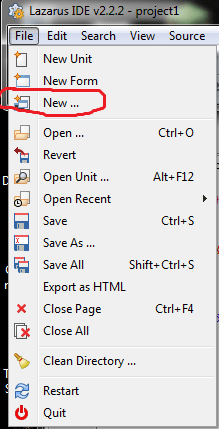
And after doing so a menu should show up, select program and click ok as shown in the image below:

What is TTaskDialog?

Right! That’s our program application type in place. For review purposes, Lazarus allows us to make many different types of Softwares. The menu that pops up. After clicking New is showing every type of software that can be made in Lazarus. The Program Application Type is what we use for this example. Moving on!

Step 2 – Assembling The Components!

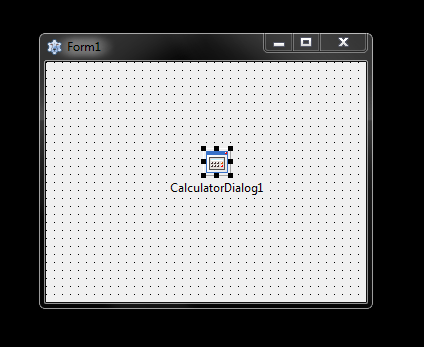
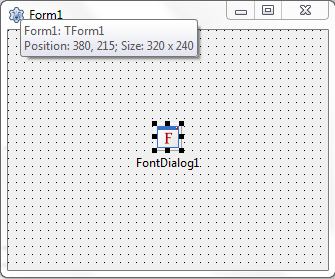
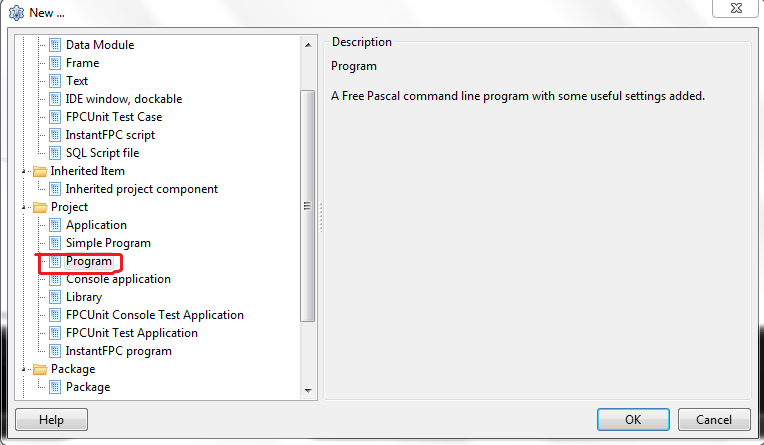
Now that our program is in place, Let’s get to work. In the top menu of Lazarus, at the toolbar. There is a place called Dialogs. Click that and then click the TTaskDialog button. Then click on the form. Your Screen Should look like this:

What is TTaskDialog?

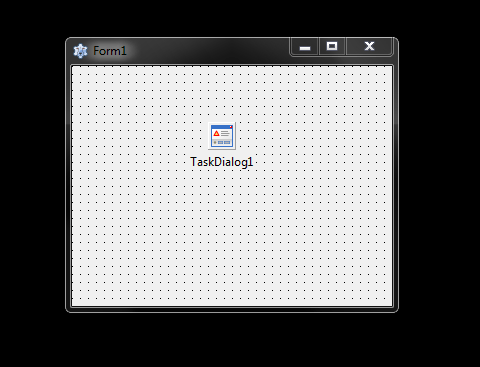
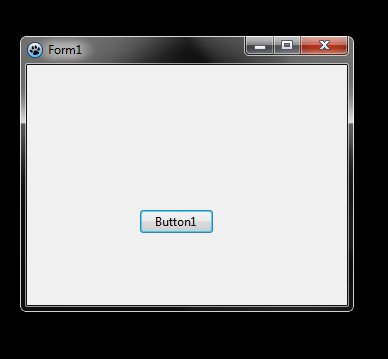
Now near the same place as the Dialogs menu. Click the Standard Menu. Then click the TButton once, and click again on the form. It should look like this after completion:

All right! If you made it this far, Well done! Now to the fun part. Double click on the button. And you will be taken to a new menu. Here is where we write the code now for the button to work. It’s really simple and you will understand it as soon as you write it down.

Step 3 – Coding The Button

Once you are on the place where we write code. (We lazarus users call it the Source Editor). When you double click on the button, your mouse cursor will be automatically directed to where you start writing the code. Between the “begin” and “end” write this code as shown in the image:

As i mentioned earlier. The code is simple right? We simply told the computer to run the TaskDialog. And here is a side tip. In programming running code is called Executing Code. Most will already know this but just incase for those who are very new to this keep that in mind.

Now our button is in place. Time to make some changes to the TaskDialog. But a minor difference. For the task dialog we won’t have to code. We simply have to use a different menu.

Step 4 – The Task Dialog

Go to Lazarus. And press F11 on your keyboard. Upon doing so, a menu called the Object Inspector will show up.

In that menu, click on TTaskDialog on the top of that menu. Then below you will see a couple menus. Which say Properties, Events , Favorites And Restricted. Click on Properties.

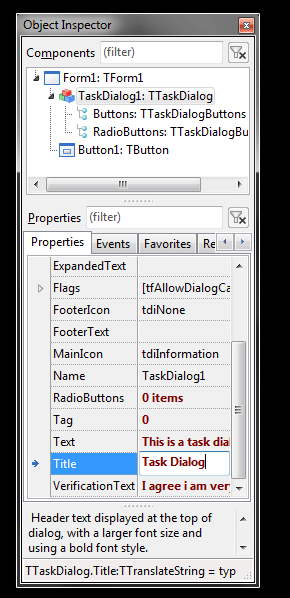
Scroll to the very bottom of the properties menu. You will find a couple places where it says “Text” , “Title” and “Verification Text”. Click on Text first. And type “This is a task dialog.” (without the quotations or with it it’s your choice).

Then click on the Title. And type “Task Dialog”. Lastly click on the Verification Text and type “I Agree I am Amazing at coding.” The object inspector should look like this:

And now for all the marvels, the final step.

Step 5 – Running The Code!

Press F9 on your keyboard and then the program will run. Once run your software menu will show up. Click the button to activate your TaskDialog. It should look like this:

Before Clicking The Button
And after clicking the button

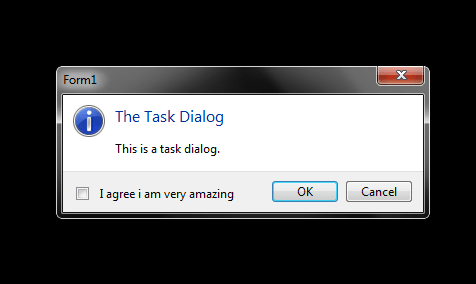
And boom! That is the final of our dialogs dealt with. And hey! It’s a moment of celebration. You typed your first bits of code, and made it through the hardest dialog box of Lazarus! Great Work And Awesome Progress! See you in future posts fellow programmer!

Posted on

What are four types of dialogs? Made Super Easy!

What are four types of dialogs? Review!

What are four types of dialogs? In earlier posts we discussed around 8 types of dialogs. Including their functions and looks. Keeping the contents of older posts related to this topic. We now have made it to the semi-final part of this topic at last. This is the 3rd Part of our 4 part series. In the last articles we discussed about the following dialogs.

  • The Open Dialog
  • The Save Dialog
  • The Select Directory Dialog
  • The Color Dialog
  • The Font Dialog
  • The Find Dialog
  • The Replace Dialog
  • The Open Picture Dialog

Proceeding Onwards!

Keeping in mind the contents of older posts and articles. Here are the names of 3 more dialogs in the Lazarus IDE. The reason why it is 3 instead of 4 i’ll mention at the very end of this article. We will discuss basic functions and appearances 3 of them in this article. More advanced stuff related to all the other articles and dialogs comes later!

What are four types of dialogs? New Dialog Time!

The Save Picture Dialog

The Save Picture Dialog, is a dialog we can use to save a picture within a given location. It’s primary usage is within softwares that we use to edit pictures and photos of sorts. Here is how it looks like without being double clicked on:

The Save Picture Dialog Without Double Clicking On It

And here is how it looks like when double clicked on like almost all dialogs:

What are four types of dialogs?
When The Save Picture Dialog Is Double Clicked On

Onwards to the final 3 types of dialogs!

The Calendar Dialog

As it’s name suggests, upon double clicking or activating. This dialog will display a calendar on the screen. When we mess with it’s properties. We can turn it into a full software of it’s own! For now we will not mess with it that much. Here is how it looks like without being double clicked on:

The Calendar Dialog WIthout Being Double Clicked On

And here is how it looks like when double clicked on:

The Adorable Calendar When Double Clicked On

Although it does have a pretty interface, it does nothing at all still. That will be dealt with later. Onwards to the 2nd Last Dialog!

The Calculator Dialog

The Calculator Dialog is almost the same as the Calendar dialog. Except, well it’s a calculator not a calendar. They both function the same way. And unlike other dialogs have a proper interface. But like all dialogs they both don’t work yet so yes. But anyways, here is how the calculator looks like without being double clicked on:

The Calculator Dialog Without Being Double Clicked On

And here is how it looks like when double clicked on:

The Adorable Calculator When Double Clicked On

Personal opinion here, the calculator and the calender share their adorableness. But humor aside. We have 1 final dialog to look after. And it may be a bit trickier to learn how to deal with it. Hence i will dedicate the next article on it. For now let us end this here. And see you in the next article!

Posted on

What Are Four types of dialogs? Made Easy!

What are four types of dialogs?

What are four types of dialogs? In the last article i discussed about the following types of dialog boxes:

  • The Open Dialog
  • The Save Dialog
  • The Save Directory Dialog
  • The Color Dialog

All of these were the basic few dialog boxes we discussed in the last post. But keep this in mind:

“Almost all components of Lazarus and Delphi are just empty shells. They will not execute any action untill we code them to so.”

The sentence above applies to dialogs too. All dialogs will only work if you add the code to make them work. Dialogs cannot function alone. Because if you put a dialog in the Form. And then run the code. All you will see is a empty form. Nothing more.

That is because the Dialog Box has been placed within the Form. But it does not know what to do or how to even show it’s face. To make it show it’s face we have to use other components. Like TButtons with it but thats for a later post!.

For now we discuss 4 more types of dialog boxes to continue our series on this. This is part 2 of our series on dialog boxes. Let’s begin!

Where we left off

In the last post i discussed the usage of the 4 basic dialog boxes. There are 12 dialog boxes in the Lazarus IDE. So i splitted the contents of the article in 4 parts. This is part 2 of the dialog boxes. Let’s begin!

New Dialogs To Learn Below!

The Font Dialog – To Bring Spice To Barren Text!

The font dialog if double clicked on without running the code. Will open up the font menu. Here you can change to font of the text. However, just like all other dialogs. It will not change the font of the text even if you use the dialog to do it. It will only change the font if we first write the code to make it do so.

Here is how it looks like without being double clicked on:

What are four types of dialogs?
A view of the Font Dialog without being clicked on

And here is how it looks like when double clicked on without running the code:

The Font Dialog After Being Double Clicked On Without Running The Code

It’s a simple dialog and it is also what we can use to make a copy of notepad! Onwards to the next dialog!

The Find Dialog – Our Text Finder!

The Find Dialog is what we can use in softwares such as Notepad to find a specific piece of text. It is incredibly simple and easy to use. But like all other dialogs. This will not work either for the time being. Again we have to first write down the code for it and then it will work. But for now, keep it’s function in mind.

Here is how the Find Dialog looks like when we drag and drop it onto the form. And neither double click it or run the code:

The Find Dialog WIthout Being Ran Or Double Clicked On

and here is a picture of how it looks like when put on the form, and double clicked without running the code:

A View Of The Find Dialog Without Being Run Or Double Clicked On

For those of you worried on how to use it. Do not worry once the general concept of dialogs is completed in these articles. I’ll move on to their usage. And even to the code we can use to make them work. For now onwards to the next dialog!

The Replace Dialog – Replacements For All!

The Replace Dialog is also another dialog used within the notepad application. It is an important feature of notepad. Used to find and then replace specific pieces of text. It has a simple and basic but important function. But as repeated before, it won’t work just yet. We first need to write the code to make it work, but we do that stuff later. Here is how it looks like without being ran or double clicked on:

The Replace Dialog When Not Ran or Double Clicked On

And here is how it will look like after double clicking:

The Replace Dialog After Being Double Clicked On

Now off we go to the final dialog for this part of the related article.

The Open Image Dialog – Picture Viewing!

This is a simple to use dialog. As it’s name suggests, once activated this dialog will open a screen to select a Image file. This file is then used by a software of sorts. Here is how it looks like without being ran or double clicked on:

The Open Picture Dialog Without Being Ran As Code Or Double Clicked On

And here is how it looks like after being double clicked on but not run as code:

The Open Picture Dialog When Double Clicked On

That about concludes this part 2 of my article on dialog boxes of Lazarus. The next few dialog boxes might be a tad bit complicated for some. But i’ll explain it so no need to panic just yet. Stay tuned for more posts, See you next post! and thanks for reading.

Posted on

What are four types of dialog boxes? Simple!

What are four types of dialog boxes?

What are four types of dialog boxes? There are many types of dialog boxes. While writing this article, there are 12 dialog related components within Lazarus. To make sure this article does not go too big so you die of boredom. Im splitting this into 4 parts. 4 dialogs per part! Now for a question to answer below….

What are Dialog Boxes? What are four types of dialog boxes? Explained below!

Lazarus and Delphi both have a whole lot of components that we can piece together to make software. There are many types of components that we will have to talk about. But the simplest of them are Dialog boxes. Dialog boxes are the menus that show up when you say save a file in note pad. When you save a file in notepad it will ask you to choose a place to put the file in.

That menu which helps you choose the place where you want to save a file is a Save Dialog. As such there are many dialogs in existence of Lazarus and Delphi. Combining some code, buttons and dialog boxes we can even make a copy of notepad!

What are four types of dialog boxes? Details Below!

There are quite a few types of Dialog Boxes. This might need me to split the contents of this article into 2 or 3 parts. But regardless, here are a few basic dialog boxes listed below.

The Open Dialog – Literal Opener Of Files

All components may or may not show how they look like when dragged and dropped on a Form. Some show their faces other do not. But they will show their face if you double click on them. Or use the Object Inspector to select them. In the case of dialogs, they do not show how they look like on first glance. Here is how a Open dialog looks like at first glance:

Open Dialog When Not Double Clicked On

and here is how it looks like when double clicked on:

The Open Dialog When Double Clicked On


So as you can see it looks different as compared to it’s other form. But like i told earlier with the TButton example, this won’t work or do anything. Think of it as putting down a empty box. It’s there but won’t do anything or have any use. Until you put some stuff inside it or lift it to carry more than 1 object at once.

Almost all components do not function as they seem so. For such we need to have to write code to tell it what to do. Same goes with all other dialogs. And that’s the one thing they share in common.

Off to the 2nd type of Dialogs!

The Save Dialog – Savior Of Many Files!

As i mentioned above, dialogs share one thing in common. That is that they do not show their face. Unless double clicked on after we drop them on a form.

So like that the Save Dialog also works the same way. Once dragged and dropped onto the form. It won’t do anything yet but once we write the code to bring it to life it’ll do it’s work fine.

Here is a image of the Save Dialog without double clicking it:

Save Dialog Without Double Clicking

And here is the Save Dialog when double clicked on like the Open dialog:

Save Dialog When Opened By Double Clicking

Their name should suggest their function. So i don’t need to go into much details on their function yet. But don’t worry if needed i’ll explain what they do in a future post. (That is if it’s already not clear for you, leave a comment to let me know i’ll help if i can!).

Onwards!

The Select Directory Dialog – Selector Of Files!

The joke at the start of these headlines is getting old ok. But anyways the next dialog we talk about is the Select Directory Dialog. As it’s name suggests “We use The Select Directory Dialog to select a folder for usage within a software.”

Here is how it looks like without getting double clicked on:

What are four 4 types of dialog boxes?
Select Directory Dialog Without Getting Clicked On

And here is how it looks like when double clicked on within the Lazarus form:

What are four 4 types of dialog boxes?
Select Directory Dialog When Double Clicked On

Onwards to the final dialog type for this post!

The Color Dialog – Bringing Color To Blank Pages!

The color dialog is a very common dialog. It’s found in MS paint. Or even other paint softwares. “We can use the color dialog to select a specific color via the color wheel, color boxes. Or color codes”.

Here is how it looks like without getting double clicked on:

What are four 4 types of dialog boxes?
The Color Dialog Without Getting Double Clicked On

and here is what it looks like when double clicked on:

What are four 4 types of dialog boxes?
The color dialog when double clicked on

I will discuss more dialogs in further parts of this article. Stay tuned for more memes- i mean coding content. And see you in the next post! Thanks a lot for reading!